We remain fully operational. Our teams are working around the clock to ensure your deliveries continue safely.

Descargar la aplicación


Servicios al cliente
Sobre nosotros
Copyright © 2025 Desertcart Holdings Limited
Descargar la aplicación

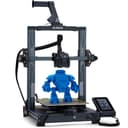
🚀 Elevate your maker game with the Neptune 3 Pro — where precision meets effortless innovation!
The ELEGOO Neptune 3 Pro is a professional-grade 3D printer featuring an 8.85x8.85x11 inch build volume, a robust dual-gear direct drive extruder made from SUS303 stainless steel, and a 36-point auto bed leveling system. Designed for quick assembly and quiet operation (under 47dB), it supports multiple filament types including PLA, TPU, PETG, and ABS. Its dual lead screw Z-axis and advanced nozzle cooling system ensure stable, high-quality prints, making it ideal for both beginners and experienced makers seeking reliable, precise, and hassle-free 3D printing.


| ASIN | B0BJCQ59JS |
| Best Sellers Rank | #2,074 in Industrial & Scientific ( See Top 100 in Industrial & Scientific ) #3 in 3D Printers |
| Customer Reviews | 4.3 4.3 out of 5 stars (1,320) |
| Date First Available | October 17, 2022 |
| Item Weight | 22 pounds |
| Item model number | Neptune 3 pro |
| Manufacturer | ELEGOO |
| Product Dimensions | 23 x 9 x 19 inches |
M**R
This is a great machine
I’ve only had a short time. I have zero prior experience with 3D printing. Once received, I watched many many YouTube videos. Setting up the machine. Using the supplied modified for this machine, Cura software. I have download some EZ to print from Thingiverse. Learned I had to extract the files. Then move the object to print onto the Cura print platform. Sometimes rotate the object on the Cura platform. Slice it, save to a removable microSD card. Make sure to click the pencil icon at bottom left of Cura screen and name it what you want before saving to the microSD card. Then insert card into the printer. I use nozzle temp 220 and plate 70. I only print one object at a time, unless small and I can place very close to each other in the Cura platform before I slice and save to microSD card. The Amolen silk shiny PLA is very nice to print great definition and to remove from plate when finished printing. Let it cool before removing. The Elegoo PLA works, but just not as nice. I use the full auto level between different objects. I try to print 3 of same objects before I do a full re level. I’ve discovered to check nozzle distance to plate after each full leveling. I run a sheet of typing paper under nozzle and adjust so there is a good drag. I first did not adjust nozzle close enough. I learned. I adjusted my Cura for a wide brim for greater adhesion of piece as it prints.watch YouTube for this. I watch carefully first several minutes to be sure the filament is lying down good. If not , i stopped , cleared away the mess, and did full leveling and nozzle distance adjustment. I watched a lot of YouTube videos. Once I decided to spend time in leveling, nozzle distance and set my nozzle and bed temperature up, it’s been really great pieces printed. Watch many YouTube videos as you learn about each aspect. After one or two days commitment to basic learning and adjusting your routine, you will be very happy with this machine. Take the time and learn. This is a great machine and overall satisfying little hobby. UPDATE. I have been using for awhile. GREAT MACHINE. I have printed many different items. All came out great. Make sure your bed heat is high enough and bed is thoroughly heated. Watch the first several layers, get in there with a flashlight. If not laying down perfectly. Stop and clear it out and start over. I’ve only needed to do this twice. This machine is a pleasure to use. Great Great! UPDATE. I’ve been using almost daily, running all night, for a little over 2 months. STILL GREAT. I’ve used ThingIVerse and also bought STL files, from Etsy. Dinosaurs, Astronaut, Furby, Candy dispense using mason jar, squishy turtles, many variations of whistles, Recorder, Bird shaped multi tone whistles, many different key fobs, pull helicopters, lots more, many items. Nozzle 220 and bed 70. Keep nozzle height low, a sheet of typing paper has pretty good friction to pull out, but not too tight either.Now a situation. My nozzle got clogged. I YouTube it. Easiest is replace it. Two extra came with the machine. Extras look inexpensive. YouTube has a very simple method to replace with needle nose pliers and 6mm socket. EZ and quick. Runs perfect after I did that. I think I’ll change that every month, just to be sure I don’t have a clog during a print job. This machine is simple to use. You MUST perform the total automatic re leveling of the bed before each print job. I’ve been disappointed when I skipped this. Great Quiet Simple machine that produces perfect items easily!! You can spend more money, but if you want a simple to use , reliable machine, BUY THIS.
A**Y
Incredible First Printer for the Tinkerer
I have now spent a few months with the Neptune 3 Pro printing almost daily and running through 6 or so kg of various materials (highly recommend Elegoo Rapid PLA+) and could not be happier. Out of the box this is a reliable, easy to assemble machine that will require a little bit of learning but serve your every day needs with minimal fuss. The real power, however, comes if you are willing to put in some extra time learning and tinkering. Here are your first steps: swap ELEGOO's Cura branch for the latest Ultimaker version, swap the Marlin Firmware for Klipper (I am running on an RPI 3b+ I had lying around) and spend a day calibrating it. You now have a reliable, inexpensive and fully tuneable platform that you can really explore on. After this you have a lot of options, but you are probably now looking for speed. For this my number #1 upgrade is a set of Bonditech CHT nozzles in 0.4, 0.6 and 0.8mm these nozzles cut the filament as it feeds so they can melt it faster and get better flow rates. Paired with ELEGOOs outstanding PLA+ or Rapid PLA+ I have been able to push my speed a bit with low layer heights while maintaining detail, or print nice fat layers (which also have the advantage of being stronger) for functional items in fractions of the time from the stock setup. If that is your cut-off point I think you will be happy, but if you want to take it further you can now look in to input shaping (my next step), hot end upgrades (whether that be heater blocks, fan shrouds or something else), linear rails or something else. One way or the other, you have a solid machine that is going to serve well for a variety of projects for a long time to come. If you are looking for a printer to really learn and grow on, you cannot go wrong with the Elegoo Neptune 3 Pro. Some of the many things I have printed so far: home organization (gridfinity!), electric and acoustic ukuleles, calibrated torque wrenches, toys, gifts, and figurines, cable ties, mounting hardware, printer add-ons, the list goes on.
A**Z
Hasta ahora no he tenido ningún inconveniente, he probado con PLA y TPU y todo bien, me falta probar con PETG y como la veo no creo tener problemas, además de económica muy completa, la recomiendo ampliamente
L**Z
No trae fallas de nada. Solo hay que calibrar la altura z con una hoja de papel, esto después de que detecte la superficie con el menú de calibración.
M**O
Un exelente producto solo me tomo tres intentos para hacer una impresión 3d de muy buena calidad...la máquina fabulosa la recomiendo
J**L
Lo probé al inicio y no funcionó adecuadamente en repetidas ocasiones, siguiendo al pie de la letra las instrucciones
P**E
Es una buena opción si empiezas a incursionar en el tema de impresiones 3D. Muy fácil de calibrar y operarla.
Trustpilot
Hace 3 semanas
Hace 1 día