


Desertcart purchases this item on your behalf and handles shipping, customs, and support to Mexico.
✨ Light up your creativity with the ultimate RGB LED cube! 🔲
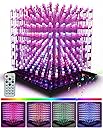
The 3D8RGB LED Cube Kit is a sophisticated 8x8x8 DIY electronics project featuring 512 tri-color RGB LEDs controlled by an STM32F103 microcontroller and MBI5024 driver chip. Designed for enthusiasts with soldering skills, it offers over 30 built-in dynamic lighting effects and comes with comprehensive instructions and lifetime technical support, making it a standout centerpiece for tech-savvy millennials seeking a blend of creativity, challenge, and vibrant home or office decor.


| ASIN | B09CYV765C |
| Best Sellers Rank | 323,551 in Toys & Games ( See Top 100 in Toys & Games ) 2,711 in Educational Science Kits |
| Brand | iCubeSmart |
| Brand Name | iCubeSmart |
| Colour | Colourful Filled |
| Connectivity Protocol | USB |
| Country Of Origin | China |
| Customer Reviews | 4.5 out of 5 stars 63 Reviews |
| Fixture Features | Colour Changing |
| Form Factor | Cube |
| Included Components | No |
| Indoor Outdoor Usage | Indoor |
| Indoor/Outdoor usage | Indoor |
| Item Dimensions | 20.3 x 20.8 x 20.3 centimetres |
| Item Length | 18 Centimetres |
| Item Type Name | diy electronics kit |
| Item Weight | 480 Grams |
| Light Color | Multicolor, RGB |
| Light source type | LED |
| Manufacturer | iCubeSmart |
| Manufacturer Part Number | 3D8RGB |
| Material | Plastic |
| Model Number | 3D8 |
| Number of Items | 1 |
| Number of Lights | 512 |
| Number of Packs | 1 |
| Power and Plug Description | USB Powered |
| Power source | USB Powered |
| Special feature | Colour Changing |
| Theme | Christmas |
| Type of Bulb | LED |
| UPC | 734257109994 |
| Unit Count | 1.0 count |
| Water Resistance Level | Not Water Resistant |
| hanging_pattern_layout | Grid |
M**R
Challenging but rewarding.
I have just finished this project. It is the 7th one of the iCubeSmart kits that I have completed. This is a challenging but rewarding project. The 512 LEDs need to be prepared before the assembly can begin. Testing must be carried out as each 8x8 section is completed because once it is fully assembled, it is difficult to make any repairs. Altogether I think it took around 16 hours to complete, but very satisfying when it was completed. Very bright and the remote control is very useful.
D**.
Fun and interesting project
Hi, so I was excited for this project, wanted to do an RGB cube for a long time. Never had the time or the knowledge to make one from scratch. With this kit, the project was very easy to assemble. Product got delivered with no problem. All part were there, and soon as it was finished everything works perfectly. It is a shame the controling board comes assembled. Would've been more fun if the control board wasn't assembled, but I understand why it's already done as it would make the board much bigger, with regular sized componens. I have made small changes, few extra extra horizontal supports on each layer, and I used the tinned wires to connect each layer to the control board. Just thought they'll be less visible, than the supplied white wire. Anyway, enjoyed this project! Big thank you to the seller, and looking forward to making 16x16x16. 😊
N**T
Excellent kit
The kit arrived on time and is fairly easy to put together, I'd say you need to have some experience with a soldering iron. I made a mark near the positive lead on each LED to make it easier to recognise after cutting the leads, I'd also cut the leads slightly longer than 6mm. The construction is straightforward, the instructions are clear and I watched the video too. It's a very well thought out project.
め**ん
素晴らしい
ネットでLEDキューブの投稿を見て以前から欲しかったのですが、最近になって8×8×8の大型サイズは安く販売されているのを見て購入(青色単色)。作ってみて気にいったので、その後も数個制作。更に調べてみると同メーカーから多色LEDタイプも出ている事を知りこれも購入、制作。単色の方がすっきりした感じで良いという思い込みがありましたが、多色の方が面白くて飽きがこないかと思います。
J**Y
Kit Has Several Extras
My kit contained the remote control shown in the Amazon pictures, and it also included the program downloader. The Amazon Rufus AI has no knowledge of these extras, so is fairly useless answering questions. You can download the programming software and other stuff on the iCubeSmart web site. There are videos on YouTube explaining how to use the programming software to create your own LED animations. There is also a YouTube video that shows you how to build the LED cube; it basically goes over the build instructions included in the kit. I found the instruction video very helpful. Both videos have no spoken audio. This makes the programming software video difficult to understand. I had to watch it several times to figure out how the software works. Better videos for the programming software are needed. There is also a YouTube video showing the LED animations supplied and pre programmed into the electronic control board. This demo is very impressive. You don't really need to create your own LED animations with the software unless you want to. It would be helpful if iCubeSmart provided a repository of user contributed animations. I have not built the kit yet but everything appears to be of high quality. Building the kit looks to be fairly labor intensive, there are a lot of solder joints! I also purchased the acrylic case, because the LED cube is just constructed of free standing wires soldered to the control board, and is probably fairly fragile. Looking forward to building the kit.
A**R
Beautiful set!
Great project, everything was there, instructions are somewhat blurry. The video is helpful. The holes to hold the LEDs in place while working could have been a tiny bit narrower, my diods kept on moving and falling off it. I am afraid you need to have good eyesight and steady hands, which I don't... Messed the first wall of leds totally. Sadly, I don't think I will be finishing it. I can solder, but this was too finnicky for me! Not the sellers fault, though!
A**Z
Die Mühe hat sich gelohnt, SUPPER SUPPORT!!!
Ich bin absolut begeistert von diesem Bausatz. Es hat zwar sehr viel Zeit, Mühe und auch Geduld gekostet, aber das war es auf jeden Fall wert. Man sollte allerdings schon etwas Ahnung vom Löten haben, und auch einen gescheiten Lötkolben besitzen. Vor allem war ich fasziniert davon, dass die LED's mehr als die drei Farben Rot, Blau und Grün anzeigen können. Auch den Support kann ich nur loben. Bei mir fehlte ein Abstandshalter, siehe Bild und ich schrieb eine Mail an den Support. In kürzester Zeit hatte ich eine Antwort und sie waren sofort bereit mir Ersatz zu schicken ich musste nur noch meine Telefonnummer schicken für den Versand (wahrscheinlich wegen dem Zoll) und am nächsten Tag bekam ich eine E-Mail mit der Versandbestätigung und der Sendungsnummer. 1,5 Wochen später bekam ich dann den Ersatz (natürlich aus China) und es war sogar noch mal ein komplettes Tütchen mit jeweils 4 Teilen drin.
S**.
Prepare yourself for a time commitment.
I have the RGB version of the cube. Overall the cube is great. The animations are quite stunning. Prepare for a time commitment. Just trimming the LED legs will take you a couple of days and I recommend doing all of them right after ensuring that you've understood how to correctly bend their legs. The cube took me about a month to put together. Here are my tips: 1. Get yourself as spool of solder, something like this: https://www.amazon.com/dp/B07QZYC5PG?ref=ppx_yo2ov_dt_b_fed_asin_title&th=1. You will use most of it. 1. Use binder clips as shown in the picture to stabilize the "scaffolding". 1.25 inch ones will work quite well. This step is very important to avoid the frustration of the horizontal bars falling out of the slots. 2. Pay super close attention to the way the legs of the LEDs should be bent. I messed up this step and soldered a whole level the wrong way. That leads me to the next point... 3. Bend the legs on one LED and use a multimeter in the diode mode to test the correctness. Put the positive probe (red) on pin number 2 (should be the only unbent leg) and then move the black probe to each of the bent legs. Compare each of the colors you see and their orientation with the picture in the manual that comes with the cube. 4. Build one panel fully. Test each LED with the multimeter. 5. Bend the legs on the rest of the LEDs. This might take up to two days. 6. Build the remaining levels and test each one with the multimeter. 7. Their video and manual doesn't describe well where the "white" wires should be connected. These are for supplying power to each of the levels (so there are 8 of them). They should each connect to a dedicated rail that you add as one of the last steps in the process. In the manual, it says these rails are for reducing the shaking, but in reality they are also needed to join the positive rails of all the rows of a level. IMPORTANT: each wire goes into hole numbered 1 thru 8 and wire 1 should connect to the lowest level, number 8 to the highest. I reversed that order initially and all my animations were upside down! The support is pretty good. They answered all my questions via email each time.
Trustpilot
2 months ago
4 days ago