


Autoglym Headlight Restoration Complete Kit
Product ID: 48657087
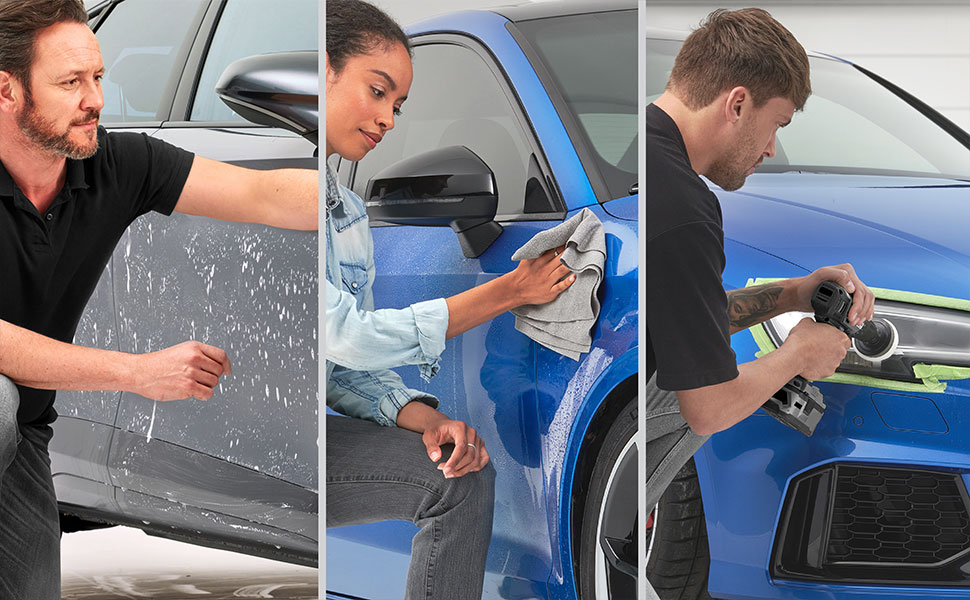
💡Restores clarity & boosts headlight brightness
🕒30-40 min per headlight restoration
⚙️Electric drill compatible sanding discs
Buy anything from 5,000+ international stores. One checkout price. No surprise fees. Join 2M+ shoppers on Desertcart.
Desertcart purchases this item on your behalf and handles shipping, customs, and support to Mexico.
✨ Bring your headlights back to life — because your car deserves to shine bright! 💡
The Autoglym Headlight Restoration Complete Kit is a professional-grade, easy-to-use solution designed for electric drill use. It includes sanding discs, restoring compound, and a microfiber cloth to quickly and safely remove cloudiness and discoloration from plastic headlights. Delivering a crystal-clear finish in 30-40 minutes per headlight, this kit enhances visibility, prevents MOT failures, and saves money on replacements—all while maintaining the integrity of your vehicle’s lenses.


| ASIN | B015OOVIRA |
| Best Sellers Rank | 2,304 in Automotive ( See Top 100 in Automotive ) 626 in Car & Motorbike Care |
| Brand | Autoglym |
| Customer Reviews | 4.6 4.6 out of 5 stars (1,835) |
| Date First Available | 29 Aug. 2015 |
| Item Weight | 319 g |
| Item model number | AG 004564 |
| Manufacturer | Altro Limited |
| Manufacturer part number | AG 004564 |
| Model | HRSKIT |
| Product Dimensions | 10 x 9 x 24 cm; 319 g |
Z**R
An outstanding product that delivers excellent results
Before I start this review, I have assigned this product 5 starts for what Amazon references as Sheerness. I have interpreted 'Sheerness' as the ability of the product to do what it claims. My reference for this is the Concise Oxford English Dictionary, 11th Edition. This product was purchased to undertake a repair to the headlights on my wife's vehicle that were starting to show early signs of 'lens bloom', external clouding on the top of the perspex main lights. I selected Auto Glym based on product reputation and 40+years of using Auto Glym products on all of our vehicles. I felt that £30.00 was an acceptable risk before purchasing 2 x new lights if this did not work. I need have had no such fears. Clear simple instructions, a supporting Auto Glym video, watched 2-3 times prior to undertaking the task were excellent training tools and gave me confidence to effectively destroy the surface of each headlight. I was able to easily remove the lights on our Volvo XC-60 and was able to perform this repairs off the vehicle. This helped me considerably and I felt gave me a better quality finish. It took me around 30-40 minutes per headlight working on a bench next to the car and providing you follow the instructions to the letter in terms of drill speed, use of water and the various grades of discs the end results were outstanding and much better than I anticipated. Overall a very professional crystal clear finish was obtained on each headlight. The headlights have been on the vehicle around 4 weeks and no signs of any bloom returning. Following the task I found I was able to recover the very fine grit discs and have reused them undertaking a headlight repair on a Mercedes due to a stone chip. I was able to remove the scratch completely that was in the middle of the headlight lens. It took around 20 minutes to complete while the headlight was left on the car. I don't have any before photos but in the attached images, on the white car the bloom extended from the top of the headlight lens over its complete length and down to 20% of the lens surface. On the grey car the chip and scratch damage was in the centre of the lens. As you can see, more than 4 weeks on the finish on both sets of lights has been exceptional. A great saving over a set of replacement lights. What a great product that even the least able DIYer will be able to obtain first class results. I have been looking for replacement fine grit discs but have managed to clean, wash and reuse the original sets of discs. The instructions from Auto Glym and clear simple and work but I recommend you also look at the video if you have never done this previously. Very highly recommended, an excellent product.
G**L
Headlights Restored!
I had begun to notice my headlights were ‘clouding’ and having seen others I decided it best to fix rather than wait. I got this pack on offer for a few pence over £20. In all honesty I didn’t expect much and was even slightly dubious, I needn’t have been. I watched the video so knew what to expect, although the enclosed instructions were very easy to follow also. Again, when it came to the sanding I was still apprehensive about performing such on plastic. Again, I needn’t have worried. I have attached a photo to show the difference and honestly, the photo doesn’t do justice to how it looks in reality, they have cleaned up great. Autoglym is a brand I’ve used before and this time they’ve hit the spot. The car was new to me but is 15 years old so ageing is expected. To be able to revive the headlights for £20 is impressive. There’s enough material left over to do both headlights again, great value for money.
Y**S
Simple to use and really does the job.
This was awkward due to the shape of the light I was restoration but the final results where very good. Highly recommended.
S**6
Great kit, restores the headlights like new!
Great kit, restored my VERY milky headlights to looking like new! Instructions very clear, easy to follow, so very happy! A couple of things to note beforehand: 1. The cream will splatter literally EVERYWHERE! I had lifted the hood, so ended up having my engine covered in a million splatters. Not a big deal, but I advise to have it covered with a plastic sheet or something. The splatters washed off easily from the paintwork, HOWEVER... Where it had landed on plastic trims (wipers, mirror etc) it left permanent staining, no amount of rubbing and even treating with Autoglym rubber and vinyl product helped. (I've attached a photo of this). Also- YOU will get all covered in splatters too, so make sure you wear clothes you dont mind getting dirty. 2. You WILL need to wash your car afterwards, so prepare for this. I thought I will get away with just wiping with a cloth, but the entire front half of my car was covered in white splatters. 3. This kit is a single use due to not having enough sanding discs in it. Which is a shame because there's plenty of product to last 2-3 times, and all the other components, but not enough sanding discs. I think for the price Autoglym could have added more discs (even if the kit was a couple of £ more). This is the only reason I deducted a star. 4. Make sure you definitely have 100% battery on your drill. I used two batteries, 100% of the first one and about 50% of the second one. It took me about an hour to restore both headlights, with the drill running almost continuously.
N**E
Amazing
Absolutely amazing product. Spent 2 hours doing my lights, they was white & would of failed mot. They are like brand new. Crystal clear. Easy to use.
A**I
It works very well!
It works very well, Autoglym provides instructions but I also found a video which is very specific and shows you how to use the product with a drill correctly step by step. I’m very happy with the result the whole process took around an hour but only because I was being cautious as I did this for the first time. I highly recommend !
P**S
Great product, here's a few tips abouti ts abilities, and a couple of mods to the procedure
This is a good product, but it can't work miracles! So here are a few things to bear in mind. Firstly turn your headlights on in the dark and have a close look at the headlamp (don't stare straight into the bulbs, they are very bright especially if Xenon). If you see lots of what look like thin parallel cracks in the plastic that you are about to treat, this may not be the product for you (These thin cracks are due to UV damage I suspect), as this system is primarily designed to remove the surface fogging annd yellowing due to UV exposure, it will remove slight surface imperfections too, but if you run your fingernail across it and it catches in the scratch then it is unlikely to remove that sort of damage, that goes for stone chips too. I make guitars for a living and have spent countless hours lacquering, flatting and polishing the finish, the principle behind this product is exactly the same, working your way through ever finer grades of abrasive until you come to the final stage with polishing compound. If you've ever worked on cars with a cellulose finish then you'll be familiar with this process too. If it is easy to remove your headlamp assembly, then do it, it is much easier if you are not worrying about damaging your paint. The car I dealt with was a 2010 Ford Focus that has spent its whole life in southern Greece and by the looks of it, stood outside exposed to the sun for its whole life so far, so no rust (Great) but loads of UV damage (Not so great). The first thing I noticed on reading the instructions is that it is a dry process in the early stages with the P800 & P1500 papers, Modern car finishing methods are dry processes these days, but require just as much skill and attention to detail as the old method with "wet or dry" paper used wet. However when sanding plastics it is all to easy for the paper to overheat and "pick up" the surface creating more damage when used dry. All of the sanding discs that are supplied are waterproof silicon cabide or similar paper, so after an initial try with dry paper that clogged fairly quickly, I swopped to using all the discs wet, I used a water spray bottle as suggested and added a few drops of washing up liquid to the water to help with lubrication and stop the paper "picking up" and becoming clogged. The next thing to note is that the roughest paper supplied is P800, pretty fine, my headlight as I mentioned had spent nearly 10 years in the Med sun, and I soon realised that I was going to be there for ever if I started with 800 grit paper, so I started with 400 grit "wet or dry" used wet, just hand sanding. I then moved onto 600 grit, before swapping to a cordless drill with the 800 grit on it. How do you know when you have used each grade sufficiently? Once the first sand is done and you have a nice flat matt surface, dry the plastic off and have a good look at it, make sure that you have removed as many of the surface imperfections as possible and note the "swirl" marks on the surface. Swap to the next grade of grit and sand until there are no signs of the marks caused by the coarser grade that you used before. Repeat the process with ever finer grades, making sure that all the marks of the previous grade have disappeared before moving to the next grade of paper. Keep the surface well lubricated so that the paper never "picks up" on the surface. (by picking up I mean that the plastic dust forms into litlle balls and not only can damage the surface but also clogs the sanding disc). The other thing I noticed was that the top surface of the plstic seemed much harder than the stuff below it, it may be that someone had sprayed my lights with UV protector, I'm not sure about that, but I could definitely see what appeared to be different layers during the initial sand and that most of the damage to my light was in that very thin top layer, whatever it was. Once finished my lights looked loads better with none of the yellowed and fogged surface any more, I had a few of the aforementioned thin cracks and they were still there but fortunately not in the line of the beams. I finished ithem off with the Autoglym Resin Polish to add some UV protection.
J**N
Pad falls apart half way through the job.
Worked really well until the drill attachment/pad thingy disintegrated. Just as well I had a spare from another product I had used last year.
B**E
Don't press too hard
Solid. Watch the youtube video.
J**R
Final clarifying coat or more polishing
The instructions tell you to use a high-speed drill, my lights have a plastic type surface so I opted to use arm power as wet and dry paper can remove a fair amount of surface material, the procedure with out the drill took about an hour per lens, using water different grades of wet and dry in circular motion and the fine paste. The kit did remove most of the light scratches and did bring back some clarity , but not perfect by any means even when using the fine paste and hard surface rubbing still looked a bit dull, it should be noted there is no clarifier final coat sealer with this kit , it’s basically keep sanding and polishing until it gets to the point that its acceptable , but I wasn’t keen on the drill idea so used a clarifier sealer from another product that supplied 2 sealer packs , this did the job for me and would pass an MOT or NCT. I have restored several head lights on several vehicles and it would appear to me if you don’t use a clarifying liquid for the final coat it could take quite a bit of rubbing and polishing to get a good result, admittedly you may have to do the restoration as a yearly or 2 yearly thing but its reasonably easy to do
S**R
Perfekt 👌
Det är värt varje krona. Vilken skillnad. Jag är helt imponerat.. Väldigt lätt använda också.. Rekommenderas varmt.. 🌟 🌟 🌟 🌟 🌟
P**M
Buen kit para pulido
Funciona genial siguiendo todos los pasos. En casos de grandes daños abra que lijar con un grado menor al que incluye el kit.
M**2
Fantastisch!!!!
Wow, de koplamen van een wat oudere Honda Civic zijn weer helemaal als nieuw geworden. Echt als nieuw!! Het eindresultaat gaf echt een wow gevoel. Zorg wel voor een goed opgeladen accu voor de schroefboormachine. Ik heb twee volle accu's gebruikt voor al het schuurwerk. Maar je resultaat wordt rijkelijk beloond!
Trustpilot
3 weeks ago
5 days ago